
Raspberry Pi Public IP & Remote Access: A Comprehensive Guide
Is it possible to unlock the full potential of your Raspberry Pi, transforming it from a local marvel to a globally accessible powerhouse? Absolutely, with a little know-how, you can turn your Raspberry Pi into a server accessible from anywhere in the world.
One of the more fascinating aspects of working with a Raspberry Pi is its potential to be a versatile tool, capable of far more than just serving as a desktop computer. A Raspberry Pi can act as a web server, a media center, or even a home automation hub. However, the ability to access your Raspberry Pi from outside your local network is often a hurdle for many. Lenik's suggestion of forwarding port 80 from your router to your Raspberry Pi is a key step, and the same principle applies to other ports needed for different services.
Here's a detailed look at how to achieve this, along with some crucial considerations:
- Is Hdhub4u Safe Risks Alternatives To Free Movie Downloads
- Warning 9kmovies Free Movie Sites What You Need To Know
Understanding IP Addresses: The Gateway to Remote Access
To understand how to make your Raspberry Pi accessible remotely, you first need to grasp the basics of IP addresses. Your network uses two types of IP addresses:
- Private IP Addresses: These are addresses used within your local network (your home or office). They are not directly reachable from the internet. Your Raspberry Pi, your computer, and your phone all have private IP addresses assigned by your router.
- Public IP Addresses: This is the address assigned to your internet connection by your Internet Service Provider (ISP). This is the address the world sees. It's how your home network is identified on the internet. This is what you need to connect to your Raspberry Pi from the outside.
The Role of Your Router
- Hdhub4u Risks Safe Alternatives What You Need To Know
- Hdhub4u Stream Download Movies For Free What You Need To Know
Your router acts as the gatekeeper between your local network and the internet. It has a public IP address assigned by your ISP and assigns private IP addresses to the devices on your network. The router's primary function is to forward traffic.
Port Forwarding: The Key to Remote Access
This is the most crucial step. "What you need to do is configure your router in your router's settings port forwarding menu to allow whatever port from external to route to your internal raspberry pi's ip," as noted by one user. This is how you direct incoming traffic from the internet to your Raspberry Pi.
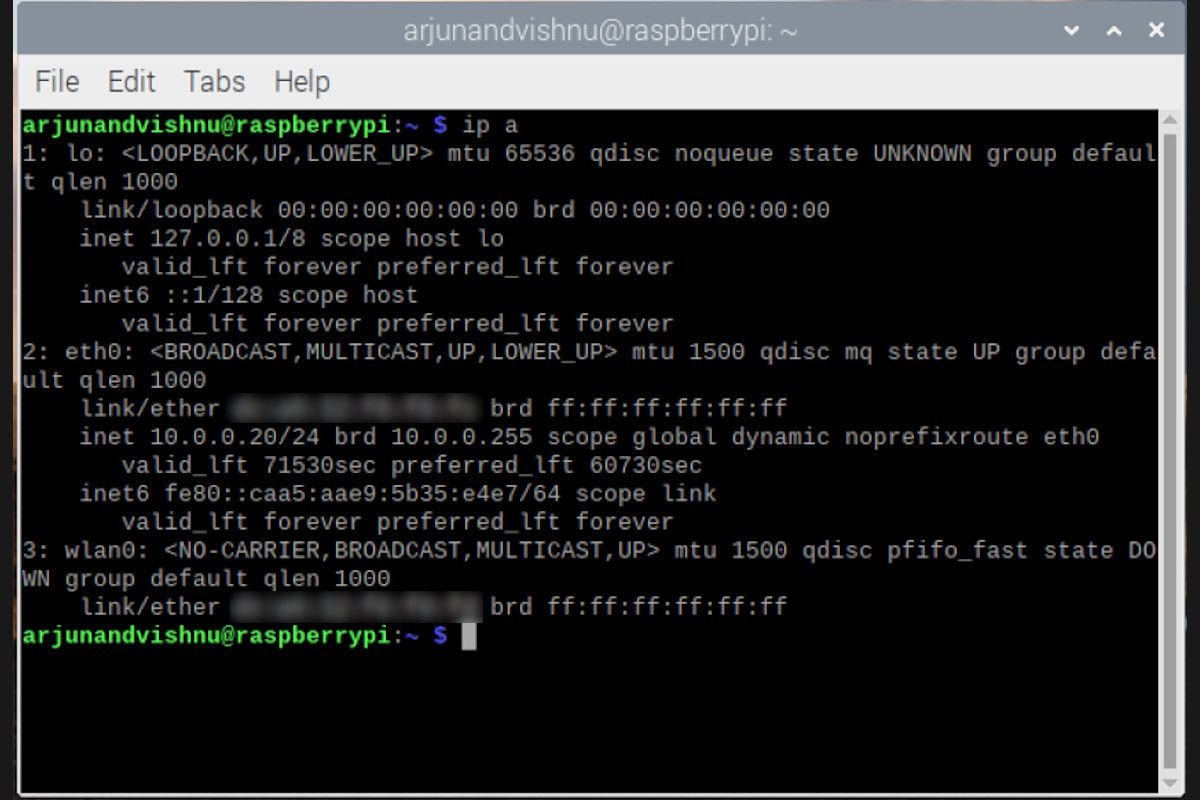
- Locate Your Raspberry Pi's Private IP Address: Before you can forward ports, you need to know the IP address of your Raspberry Pi on your local network. You can find this in your router's administration interface, or on the Raspberry Pi itself.
- Access Your Router's Settings: You'll need to log in to your router's administration panel. The method for doing this varies depending on your router model. Consult your router's manual if needed. "Go find the manual (or ask use with make and model, it may be a common one)," as the original content advises.
- Configure Port Forwarding: Navigate to the port forwarding section of your router's settings.
- Choose a Port: Select a port to forward. The default port for web servers is 80, and the default for SSH (secure shell) is 22. The Raspberry Pi 4 has SSH defined on port 23 and a webserver on port 80, but standard practice is 22 and 80 respectively.
- Enter the Raspberry Pi's Private IP Address: Specify the private IP address of your Raspberry Pi.
- Save the Settings: Save the port forwarding configuration.
"And normally forward the request to the pi's ip address for that port."
Finding Your Public IP Address
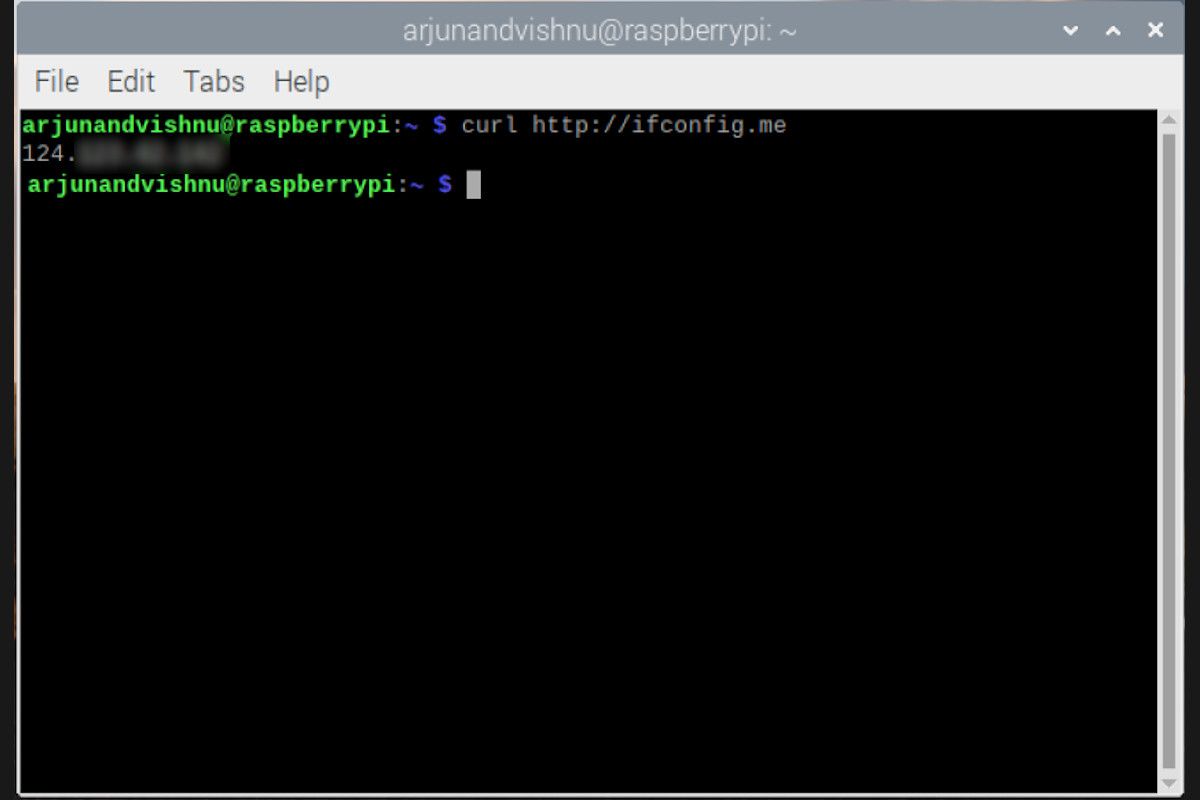
"To access your raspberry pi from outside your local network, you will need its public ip address." You can find this address in a few ways:
- Use a Website: Websites like ipv4.icanhazip.com or ipv6.icanhazip.com (if you have IPv6 enabled) will display your public IP address.
- Check Your Router's Settings: Many routers display your public IP address in their status or WAN (Wide Area Network) settings.
- Ask Your ISP: If you can't find it any other way, you can contact your Internet Service Provider.
Connecting Remotely
Once you have your public IP address, you can connect to your Raspberry Pi from anywhere with an internet connection. The exact method depends on what services you have enabled on your Pi:
- For a Web Server: Open a web browser and enter your public IP address. If you've forwarded port 80, you should see your website hosted on your Raspberry Pi.
- For SSH: Use an SSH client (like PuTTY on Windows or the terminal on macOS/Linux) to connect to your public IP address and the port you've forwarded (usually 22). You will need your Raspberry Pi's username and password.
- For VNC (Remote Desktop): "After installing, simply enter your pis public ip and connect on port 5901. You can now access your raspberry pis desktop environment securely from anywhere with internet access." This assumes you have VNC server installed and running on your Pi and have forwarded the correct port (often 5900 or 5901).
Dynamic IP Addresses and Dynamic DNS
A common challenge with this setup is that most ISPs assign dynamic IP addresses. This means your public IP address can change periodically. If your IP changes, you'll need to find the new address to connect.
"If you have problem accessing raspberry pi public ip address because it changes dymanically here is what you need."
Dynamic DNS (DDNS) Services: Dynamic DNS services solve this problem by associating a domain name (like myraspberrypi.com) with your dynamic IP address. The DDNS service automatically updates the domain name's IP address whenever your public IP changes. "Dynamic dns (ddns) is a service that maps your dynamic public ip address to a domain name. This is useful when hosting services like wordpress, ghost, or an nginx server at home, as it allows you to access your raspberry pi using a consistent domain name, even if your isp changes your ip address."
Security Considerations: Protecting Your Raspberry Pi
"While remote accessing your pi is very convenient, it also comes with security risks." Opening your Raspberry Pi to the internet increases its attack surface. Here are some ways to enhance security:
- Change Default Passwords: The first and most crucial step. Change the default username and password for your Raspberry Pi.
- Use Strong Passwords: Use strong, unique passwords for all user accounts on your Raspberry Pi.
- Enable a Firewall: Configure a firewall on your Raspberry Pi (like `ufw`) to restrict access to only the necessary ports.
- Use SSH Keys: "The raspberry pi will need to be able to connect to the vps via ssh, so you should create an ssh key pair for this purpose." Instead of using passwords for SSH, use SSH keys for more secure authentication.
- Keep Your Software Updated: Regularly update your operating system and software packages to patch security vulnerabilities.
- Consider a VPN: "If you have a vps you could also set up a vpn...But if it is just your own laptop/smartphone/whatever you want to use, you put a vpn server on the vps, have the pi configured to stay connected all the time, and use a vpn client from the whatever device." Setting up a VPN (Virtual Private Network) is one of the most secure methods. You connect to your VPN server, and all your traffic is encrypted, providing an extra layer of security.
- Restrict Access by IP Address: If possible, restrict access to your Raspberry Pi to specific IP addresses.
- Monitor Logs: Regularly review your system logs for suspicious activity.
Alternative Access Methods
If you don't have a public IP address (e.g., you're using a standard provider or Wi-Fi on a cruise line), or want an easier setup, consider:
- Reverse SSH Tunnels: Set up a reverse SSH tunnel to a server you control with a public IP address (a VPS - Virtual Private Server). The Pi initiates the connection to the VPS, and you can then connect to the Pi through the VPS.
- Cloud Services: Some cloud services offer easy remote access solutions for Raspberry Pi devices.
Practical Example - Setting up a Web Server
Let's say you want to host a simple website on your Raspberry Pi.
- Install a Web Server: Install a web server such as Apache (`sudo apt update && sudo apt install apache2`) or Nginx (`sudo apt update && sudo apt install nginx`).
- Place Your Website Files: Place your HTML files in the web server's document root (usually `/var/www/html/`).
- Configure Port Forwarding: In your router, forward port 80 (HTTP) to your Raspberry Pi's private IP address.
- Find Your Public IP Address: Use the methods described above.
- Access Your Website: Open a web browser and enter your public IP address. You should see your website.
Working with Raspberry Pi Pico W
"I'm using raspberry pi pico w. With an html code, when i enter the ip address of the raspberry pi pico w from a computer on my local network, i can control its leds using buttons. However, i want to be able to do this not only from my local network but also remotely by opening it to the internet."
The process for the Raspberry Pi Pico W is similar to the standard Raspberry Pi, but with a few adjustments. You'll still need:
- A Public IP Address
- Port Forwarding in Your Router
- To configure the Raspberry Pi Pico W for remote access.
Troubleshooting
If you're having trouble, here are some common issues and solutions:
- Port Forwarding Not Working: Double-check your router's settings. Make sure you've entered the correct private IP address of your Raspberry Pi and the correct port number. Check your router's documentation.
- Firewall Issues: Make sure your Raspberry Pi's firewall (if enabled) allows traffic on the forwarded ports.
- Incorrect Public IP Address: Make sure you're using the correct public IP address. Your IP address may have changed.
- ISP Restrictions: Some ISPs block certain ports. Contact your ISP if you suspect this.
- Double NAT: If you have multiple routers in your network, you might have a "double NAT" situation, which can complicate port forwarding.
- DNS Resolution: Ensure your Pi can resolve DNS names if you're using them.
The Importance of a Static IP (and Alternatives)
"Another option is to use address reservation if you router supports it, so you set the ip you want your pi to have in the router so when the pi requests an ip the router always gives it the same ip." While not strictly required, a static IP address on your Raspberry Pi simplifies remote access, especially for services that depend on a consistent IP. It ensures that the Raspberry Pi always has the same private IP address on your local network. You can usually set this up in your router's DHCP settings. Alternatively, you can configure a static IP directly on the Raspberry Pi's network configuration file (`/etc/dhcpcd.conf`).
Practical Examples and commands
Lets say you want to copy a file from your computer to your raspberry pi.
"To copy a file named myfile.txt from your personal computer to a users home folder on your raspberry pi, run the following command from the directory containing myfile.txt, replacing the placeholder with the username you use to log in to your raspberry pi and the placeholder with your raspberry pis ip address:"
`scp myfile.txt user@:/home/user/`
Where:
- `myfile.txt` is the name of the file.
- `user` is your username on the Raspberry Pi.
- `` is your Raspberry Pi's public IP address.
- `/home/user/` is the destination directory on the Raspberry Pi.
Accessing Grafana Dashboard Remotely
"I am using grafana to create graphs of sensor data on the raspberry pi. I can access the dashboard from the raspberry pi through a web browser using the url: However, i cannot seem to be able to connect to the dashboard when i replace the url with :3000. The idea is for me to be able to connect to this"
The same principles apply to accessing Grafana remotely. To access your Grafana dashboard, you will need to:
- Ensure Grafana is Running: Confirm that Grafana is running on your Raspberry Pi (typically on port 3000).
- Port Forwarding: Configure port forwarding on your router. You will need to forward port 3000 (or the port Grafana is configured to use) to the Raspberry Pi's internal IP address.
- Find Public IP: Obtain your public IP address.
- Access the Dashboard: In a web browser, enter your public IP address followed by :3000 (or the Grafana port) e.g., `http://:3000`.
Creating a Public Website with Nginx
If your intention is to host a website, the process involves setting up a web server.
"Creating the virtual host for your raspberry pis public website. We are finally at the point where we can write a nginx virtual host. This virtual host will define the static website we want to host on our raspberry pi publicly. You can begin to write this virtual host on your raspberry pi using the following command."
The command to write a nginx virtual host can be tailored to your needs.
Putting it all together
The process includes:
- Choose and install a web server (e.g., Nginx or Apache).
- Place HTML, CSS, JavaScript, and image files in the web servers document root, such as `/var/www/html`.
- Configure port forwarding in your router to forward traffic on port 80 (HTTP) or 443 (HTTPS) to your Raspberry Pi's private IP address.
- Find your public IP address.
- Access your website in a web browser by entering your public IP address.
Prerequisites and tools
"So now that you have some background information about this project, here are some prerequisites to get your own static ip from your raspberry pi at home.Raspberry pi with raspbian installed if you do not have raspbian installed on a raspberry pi go here;Access to router administration (i have a panoramic tg1682 with arris admin)"
Tools include:
- Raspberry Pi with Raspbian or another OS installed.
- Access to router administration panel.
The Final Word
Making your Raspberry Pi accessible from the outside world is a rewarding endeavor that unlocks a wide range of possibilities. Whether you're building a home automation system, hosting a personal website, or simply wanting to access your files remotely, the steps outlined above will enable you to harness the full power of your Raspberry Pi. Remember to prioritize security at every stage to ensure your Pi and your network remain protected.
| Raspberry Pi Remote Access: Key Concepts | |
|---|---|
| Topic | Details |
| Public IP Address | Globally routable address assigned by your ISP. Essential for external access. |
| Private IP Address | Used within your local network. Not directly reachable from the internet. |
| Router | Acts as the gateway between your local network and the internet. Manages IP addresses and forwards traffic. |
| Port Forwarding | Configuring your router to direct incoming traffic on specific ports to your Raspberry Pi's private IP address. |
| Dynamic DNS | A service that maps your dynamic public IP address to a domain name, useful if your IP changes. |
| Security | Critical considerations include changing default passwords, using strong passwords, enabling a firewall, using SSH keys, and keeping software updated. |
| SSH | Secure Shell - A secure protocol for remote access and command-line interaction. |
| VNC | Virtual Network Computing - A remote desktop protocol for accessing your Raspberry Pi's graphical environment. |
Article Recommendations

Detail Author:
- Name : Lia Yost III
- Username : rboehm
- Email : vschroeder@hotmail.com
- Birthdate : 1977-12-05
- Address : 3938 Bruen Throughway Suite 178 Cormiermouth, NC 23960
- Phone : 734-938-5418
- Company : Rutherford, Johnson and Schamberger
- Job : Aircraft Launch Specialist
- Bio : Repudiandae quia aut eveniet quia. Debitis porro et assumenda animi. In qui molestias cum temporibus.
Socials
twitter:
- url : https://twitter.com/albin_weber
- username : albin_weber
- bio : Atque cumque expedita similique facere soluta saepe sint. Enim eos esse qui qui et voluptatibus suscipit nobis. Est voluptatem quod et modi.
- followers : 2458
- following : 1795
facebook:
- url : https://facebook.com/aweber
- username : aweber
- bio : Officia ratione iusto optio et provident.
- followers : 6586
- following : 2547
instagram:
- url : https://instagram.com/weber2018
- username : weber2018
- bio : Adipisci quisquam amet atque veniam et. Vero commodi ut ex totam.
- followers : 1357
- following : 1316
linkedin:
- url : https://linkedin.com/in/albin.weber
- username : albin.weber
- bio : In deleniti nemo est in suscipit.
- followers : 4828
- following : 2415
tiktok:
- url : https://tiktok.com/@weber1986
- username : weber1986
- bio : Sunt voluptas qui fugiat occaecati ducimus quis.
- followers : 942
- following : 155
