![Unveiling "Evelyn" In BG3: Guide & Mods - [Explained!]](data:image/svg+xml,%3Csvg%20xmlns=%22http://www.w3.org/2000/svg%22%20viewBox=%220%200%20210%20140%22%3E%3C/svg%3E)
Port Forwarding & VNC Access For Raspberry Pi: A Guide
Are you yearning to access your Raspberry Pi from the far reaches of the internet, managing projects and tinkering with code from anywhere in the world? The power to remotely control your Raspberry Pi is within your grasp, transforming your device into a versatile tool accessible from any location with an internet connection.
The quest to remotely access a Raspberry Pi often begins with port forwarding, a fundamental concept in networking that allows external devices to connect to specific services running on your internal network. Imagine your router as a gatekeeper, and port forwarding as a mechanism to specify which services (like VNC for screen sharing or SSH for secure remote access) are permitted to communicate with the outside world. Successfully configuring port forwarding requires understanding your router's interface, identifying the Raspberry Pi's internal IP address, and specifying the correct port numbers.
For those new to the world of Raspberry Pi and remote access, the process might seem daunting. Rest assured, it's a journey that is well worth the effort. Various methods exist, each with its own advantages and complexities. Let's delve into the core techniques, exploring port forwarding, VPN solutions, and cloud-based services that empower you to connect to your Raspberry Pi remotely.
- Watch Movies Online Streaming Download Guide
- Find Your Next Movie Best Streaming All Movies Hub Alternatives
| Feature | Description | Considerations |
|---|---|---|
| Port Forwarding | This involves configuring your router to forward specific ports (e.g., 5901 for VNC) to your Raspberry Pi's internal IP address. | Requires understanding your router's interface, can be less secure if not configured properly, and might require a static IP for your Raspberry Pi. |
| VPN (Virtual Private Network) | Setting up a VPN creates a secure, encrypted connection between your device and your home network, allowing you to access your Raspberry Pi as if you were on the local network. | Provides a secure connection, requires a VPN server setup (e.g., on your router or Raspberry Pi), and might involve configuring the VPN client on your accessing device. |
| Cloud-Based Services (e.g., RealVNC) | These services act as intermediaries, allowing your Raspberry Pi to connect to their servers, which you can then access from anywhere, eliminating the need for direct port forwarding or VPN setup. | Offers simplicity and ease of use, may involve subscription fees, and relies on a third-party service. |
| Raspberry Pi Connect | A free screen sharing and remote shell service provided by Raspberry Pi. | Simplifies remote access, specifically designed for Raspberry Pi devices. |
Raspberry Pi Official Website
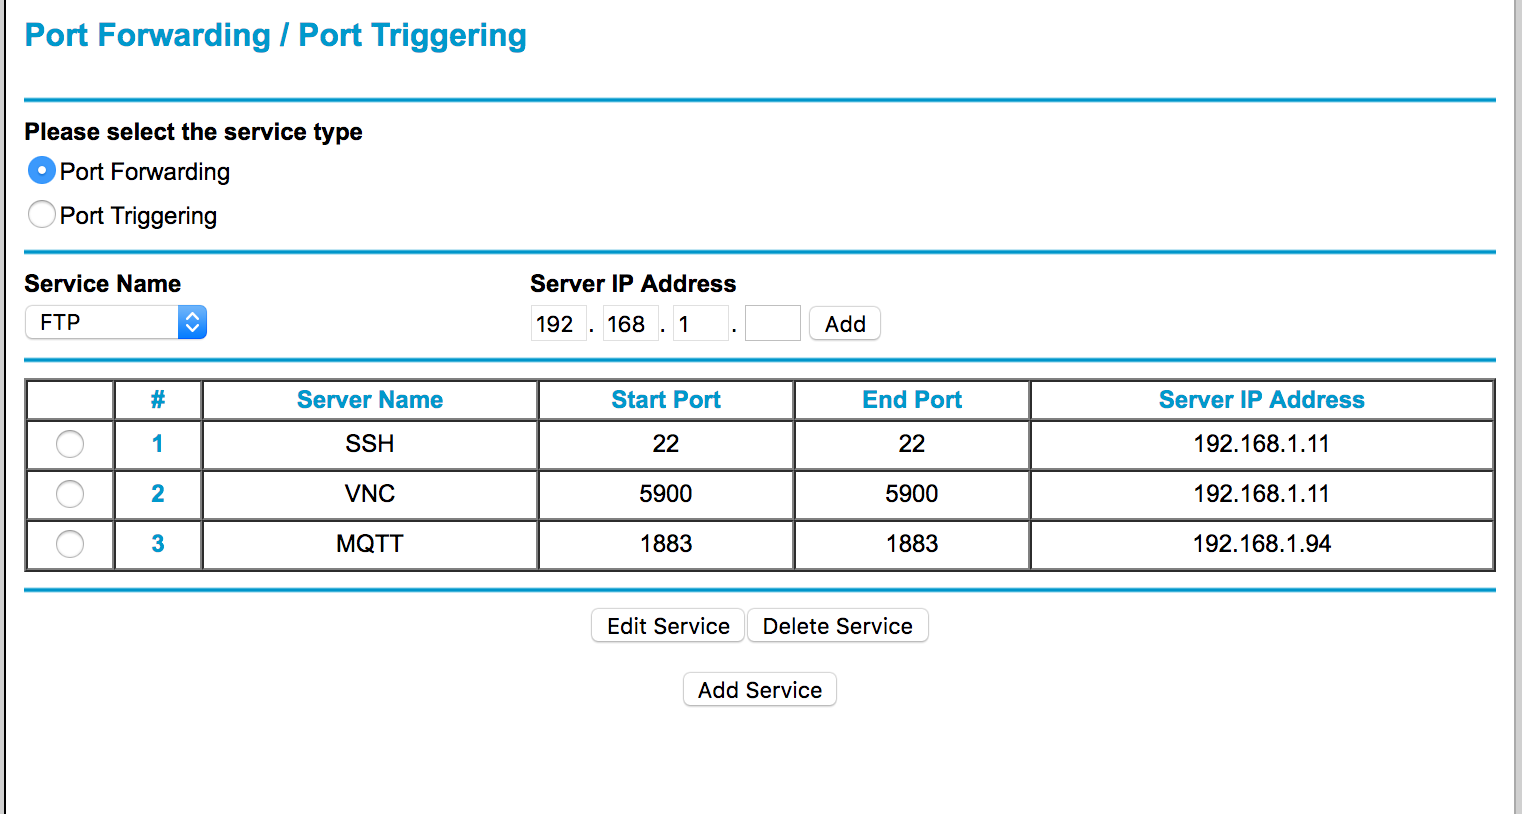
For those who choose the port forwarding route, the process typically unfolds as follows: First, you'll need to log in to your router's configuration interface. This usually involves typing your router's IP address (often 192.168.1.1 or 192.168.0.1) into a web browser and entering your administrator username and password. Once logged in, you'll navigate to the "Port Forwarding," "Virtual Servers," or similar section. Here, you'll create a new rule. The rule will specify the external port (the port you'll use to connect from outside your network, e.g., 5000), the internal port (the port your Raspberry Pi is listening on, usually 5901 for VNC), the Raspberry Pi's local IP address, and the protocol (usually TCP). Some routers require you to enter the internal and external port numbers, while others will automatically populate them. After saving the settings, it's often necessary to restart your router for the changes to take effect.
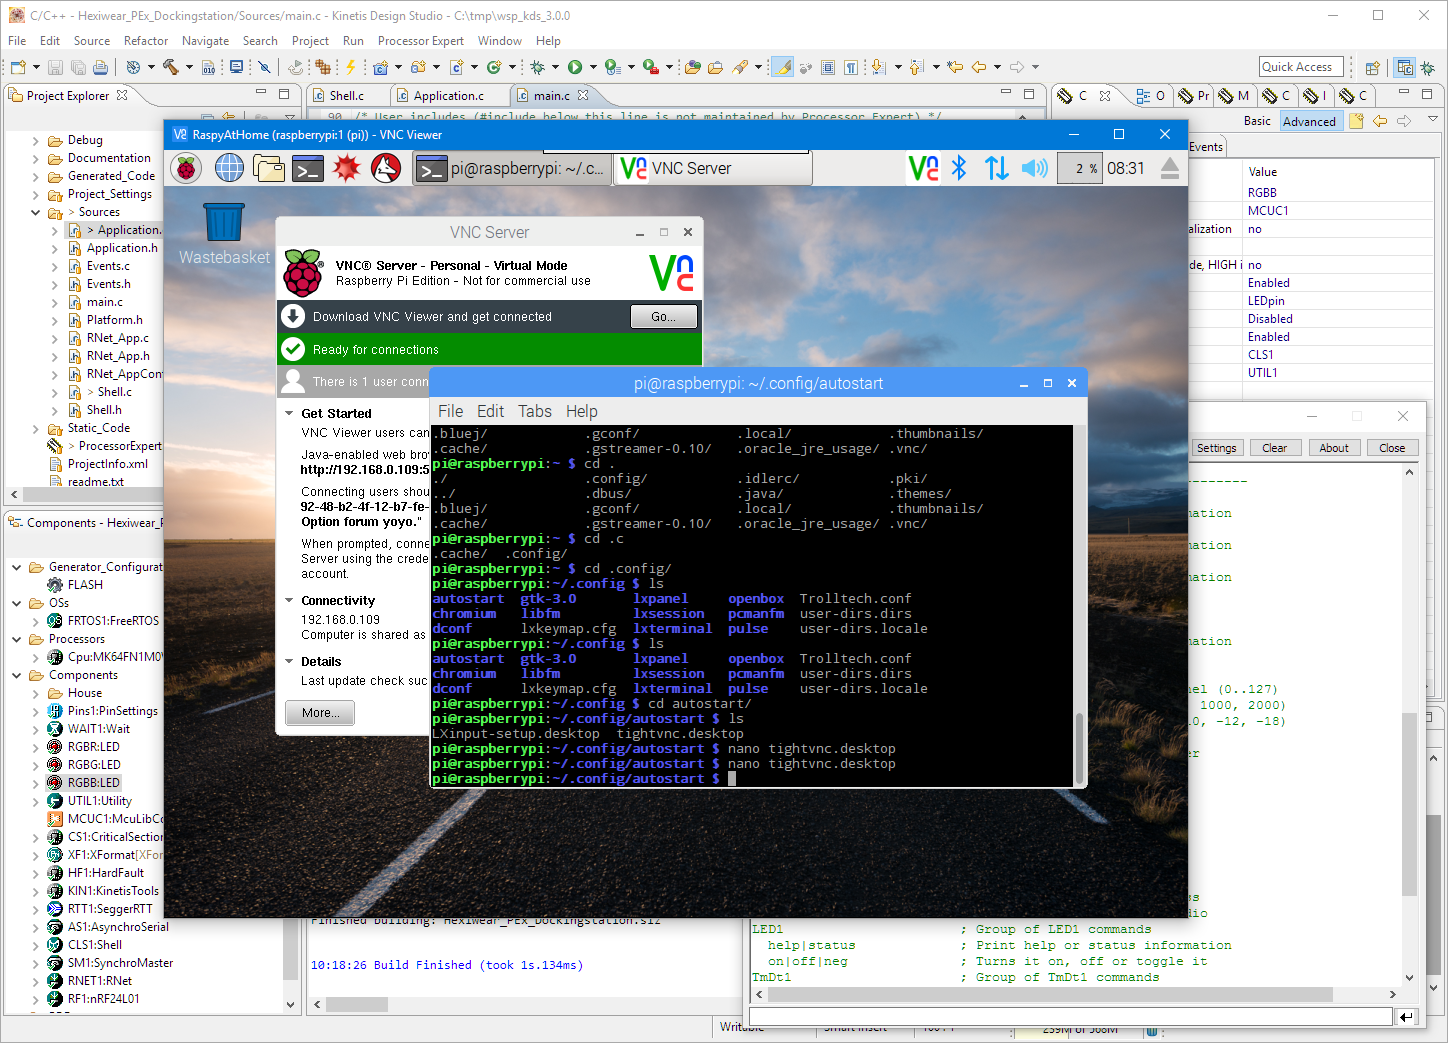
When establishing a VNC connection on your local network, you'd typically use a VNC viewer like TightVNC Viewer. To connect, you would enter the Raspberry Pi's IP address followed by ":1" to specify the display (e.g., `192.168.1.205:1`). When connecting from outside your network, you'll use your public IP address (the IP address of your home network, which you can find by searching "what is my IP" on Google) followed by the port number you configured in your router (e.g., `your_public_ip:5000`).
Beyond the fundamentals, there are advanced techniques for remote access. Some users will explore methods that involve creating a secure tunnel over SSH, or use port 443 on their router for security benefits. Others opt for DMZ, which will give your Raspberry Pi more exposure. It is important to note that you have to manage these settings with care.
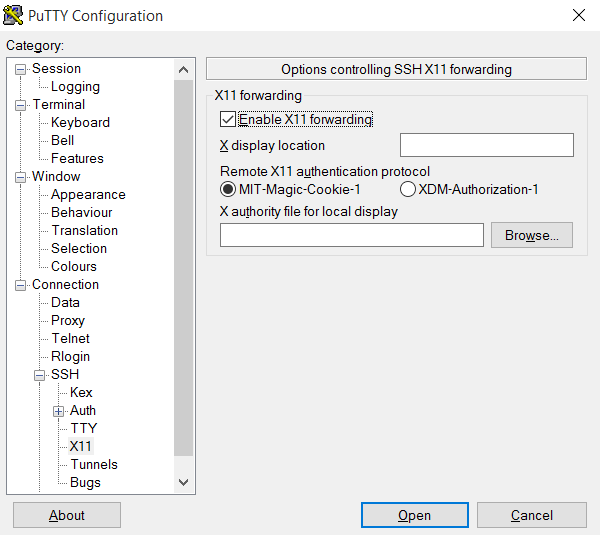
SSH, or Secure Shell, is another vital tool for remote access, providing a secure way to connect to your Raspberry Pi's command line. Instead of forwarding VNC, some may opt to forward port 22 (the default SSH port) on your router to the Raspberry Pi. From there, you can tunnel VNC over SSH, enhancing security by encrypting the VNC connection. You might also use SSH to transfer files securely or execute commands remotely.
Cloud-based solutions like RealVNC offer an elegant alternative to port forwarding. By using the RealVNC cloud platform, your Raspberry Pi connects to RealVNC's servers, which can then be accessed from anywhere, removing the need for complicated port forwarding configurations. Setting up RealVNC typically involves creating a free (or paid) account, installing the RealVNC server on your Raspberry Pi, and logging into the server and client software using your RealVNC credentials. Once connected, you'll have seamless, secure access to your Raspberry Pi's desktop.
One crucial point to consider is security. When using VNC over the open internet, all data transmitted, including passwords, is in plain text. Therefore, it's vital to only use VNC in a local network. If your Raspberry Pi is reachable via port forwarding or directly from the internet, it can be attacked via the VNC server. Utilizing SSH tunnels or a VPN adds a layer of encryption, protecting your data from eavesdropping.
To summarize some core steps: Configure port forwarding on your router, making sure to specify the Raspberry Pi's IP address and the ports to be used. Install a VNC server on your Raspberry Pi (such as TightVNC server or RealVNC server). When you are setting up your VNC server, take note of the listening port it is using. Use a VNC client on your accessing device (e.g., TightVNC viewer) and enter your public IP address followed by the port you forwarded (e.g., your_public_ip:5000) to connect remotely. Alternately, you can explore cloud-based services like RealVNC, or leverage SSH tunnels for a more secure access method.
It is also important to consider the following recommendations while accessing your device remotely: Always use strong, unique passwords for your Raspberry Pi and your router. Keep your Raspberry Pi's operating system and software up to date to patch any security vulnerabilities. Regularly review your port forwarding settings and close any ports that you are not using. If possible, use a VPN to encrypt your connection, providing an extra layer of security. Disable VNC and SSH if not actively in use, and restrict access to your router's configuration interface.
For those venturing into this, there are useful steps for automating your setup. Automating SSH and VNC to start on boot can make remote access seamless. This means that your Raspberry Pi will be accessible from any location that you set it up, which can save you the extra time and effort to get started on each boot. This automation significantly streamlines the remote access process.
This exploration into remotely accessing a Raspberry Pi is not just about technical steps; it is about unlocking the full potential of your projects. From monitoring projects to managing them from anywhere, the ability to access your Raspberry Pi remotely transforms it into a powerful tool, ready for your command. By following these steps, you're equipping yourself with the skills to remotely monitor and manage your projects from anywhere in the world.
Article Recommendations
- Get Free Movies Latest Bollywood More On Hdhub4u Download Now
- Kannada Movies More Your Guide To Safe Streaming Alternatives
Detail Author:
- Name : Providenci Rempel
- Username : carter.lourdes
- Email : calista11@kilback.com
- Birthdate : 1999-08-12
- Address : 63114 Berge Divide Apt. 290 Oswaldoton, MA 54824
- Phone : (484) 532-5616
- Company : Kris, Gutkowski and Champlin
- Job : Illustrator
- Bio : Aut ut rem esse doloremque repellat omnis odit. Ut suscipit reiciendis ipsa quis et. Laudantium repudiandae non et provident deserunt fugiat autem.
Socials
linkedin:
- url : https://linkedin.com/in/spaucek
- username : spaucek
- bio : Tempore voluptas harum ipsa eos laudantium.
- followers : 4722
- following : 833
instagram:
- url : https://instagram.com/sigurdpaucek
- username : sigurdpaucek
- bio : Molestias officia omnis saepe itaque est odit ut repudiandae. Alias sint ipsa voluptates sit.
- followers : 1460
- following : 2349
facebook:
- url : https://facebook.com/paucek2005
- username : paucek2005
- bio : Quasi cumque est et quo non. Amet quia dolor in labore sunt voluptatem.
- followers : 6510
- following : 1201
twitter:
- url : https://twitter.com/sigurd_paucek
- username : sigurd_paucek
- bio : Veniam occaecati et laborum neque qui est. Eveniet est ut distinctio iusto consequatur. Neque perspiciatis aspernatur deserunt beatae repellendus optio.
- followers : 4633
- following : 1329
tiktok:
- url : https://tiktok.com/@sigurd_id
- username : sigurd_id
- bio : Iure quo et saepe quo eligendi iste nemo.
- followers : 6664
- following : 48
